Home Assistant is a powerful, open-source home automation platform that puts local control and privacy first. If you want to host it on the cloud, using a Linux VM in Azure and Docker is a robust and scalable option. Here’s a step-by-step guide to setting it up.
1. Setting Up the Azure Linux VM
Step 1.1: Create the Linux VM
Log in to the Azure Portal.
Navigate to Virtual Machines > Create > Virtual Machine.
Configure the VM:
Subscription: Select your Azure subscription.
Resource Group: Create a new resource group or use an existing one.
Virtual Machine Name: Choose a descriptive name, e.g., HomeAssistantVM.
Region: Select the region closest to you.
Image: Choose Ubuntu Server 20.04 LTS (or later).
Size: Select an appropriate size, e.g., Standard B1ms (sufficient for Home Assistant).
Authentication Type: Use SSH Public Key (recommended for security).
Upload your SSH public key or generate one using ssh-keygen.
Enable Public Inbound Ports
Select Allow Selected Ports
Choose SSH (22).
4. Click Next through the Networking, Management, and other tabs.
5. Review and create the VM.
Step 1.2: Connect to the VM
Once the VM is created:
Find the public IP address of the VM in the Azure Portal.
SSH into the VM using:
2. Prepare the Linux VM for Docker Installation
Step 2.1: Update the System
Run the following commands to ensure the system is updated:
3. Install & Setup Docker
Install dependencies for Docker:
4. Install Home Assistant in Docker
We change the directory to our home dir, and then we create a new directory for “Homeassistant”.
Now we can start with the preconfigured container from “home-assistant”.
Here is a detailed explanation of what the command does:
sudo:
Ensures the command runs with superuser privileges (necessary for Docker commands if not in the docker group).
docker run:
This is the base command to create and start a new Docker container.
-d:
Runs the container in detached mode (in the background). The terminal will not be attached to the container’s output.
--name homeassistant:
Assigns a name (homeassistant) to the container. This makes it easier to reference the container later using commands like docker start homeassistant
--restart unless-stopped:
Configures the container to automatically restart if it stops unexpectedly (e.g., due to a system reboot). It will remain stopped only if you manually stop it with a docker stop command.
-v /home/userdir/homeassistant:/config:
Mounts a volume between the host and the container:
/home/userdir/homeassistant -> is a directory on the host machine.
/config -> is the corresponding directory inside the container where Home Assistant stores its configuration files.
This ensures that your configurations persist across container restarts or updates.
--network=host:
Configures the container to use the host’s networking stack directly.
This eliminates network isolation between the container and the host, allowing Home Assistant to directly access the host’s network interfaces (important for Home Assistant to detect devices on the same network).
ghcr.io/home-assistant/home-assistant:stable:
Specifies the Docker image to use:
ghcr.io/home-assistant/home-assistant -> is the image's location in GitHub Container Registry.
:stable -> is the tag specifying the stable version of the Home Assistant image. If omitted, Docker will default to the latest tag.
5. Access Home Assistant
Open a browser and navigate to:
Complete the initial setup by following the on-screen instructions.
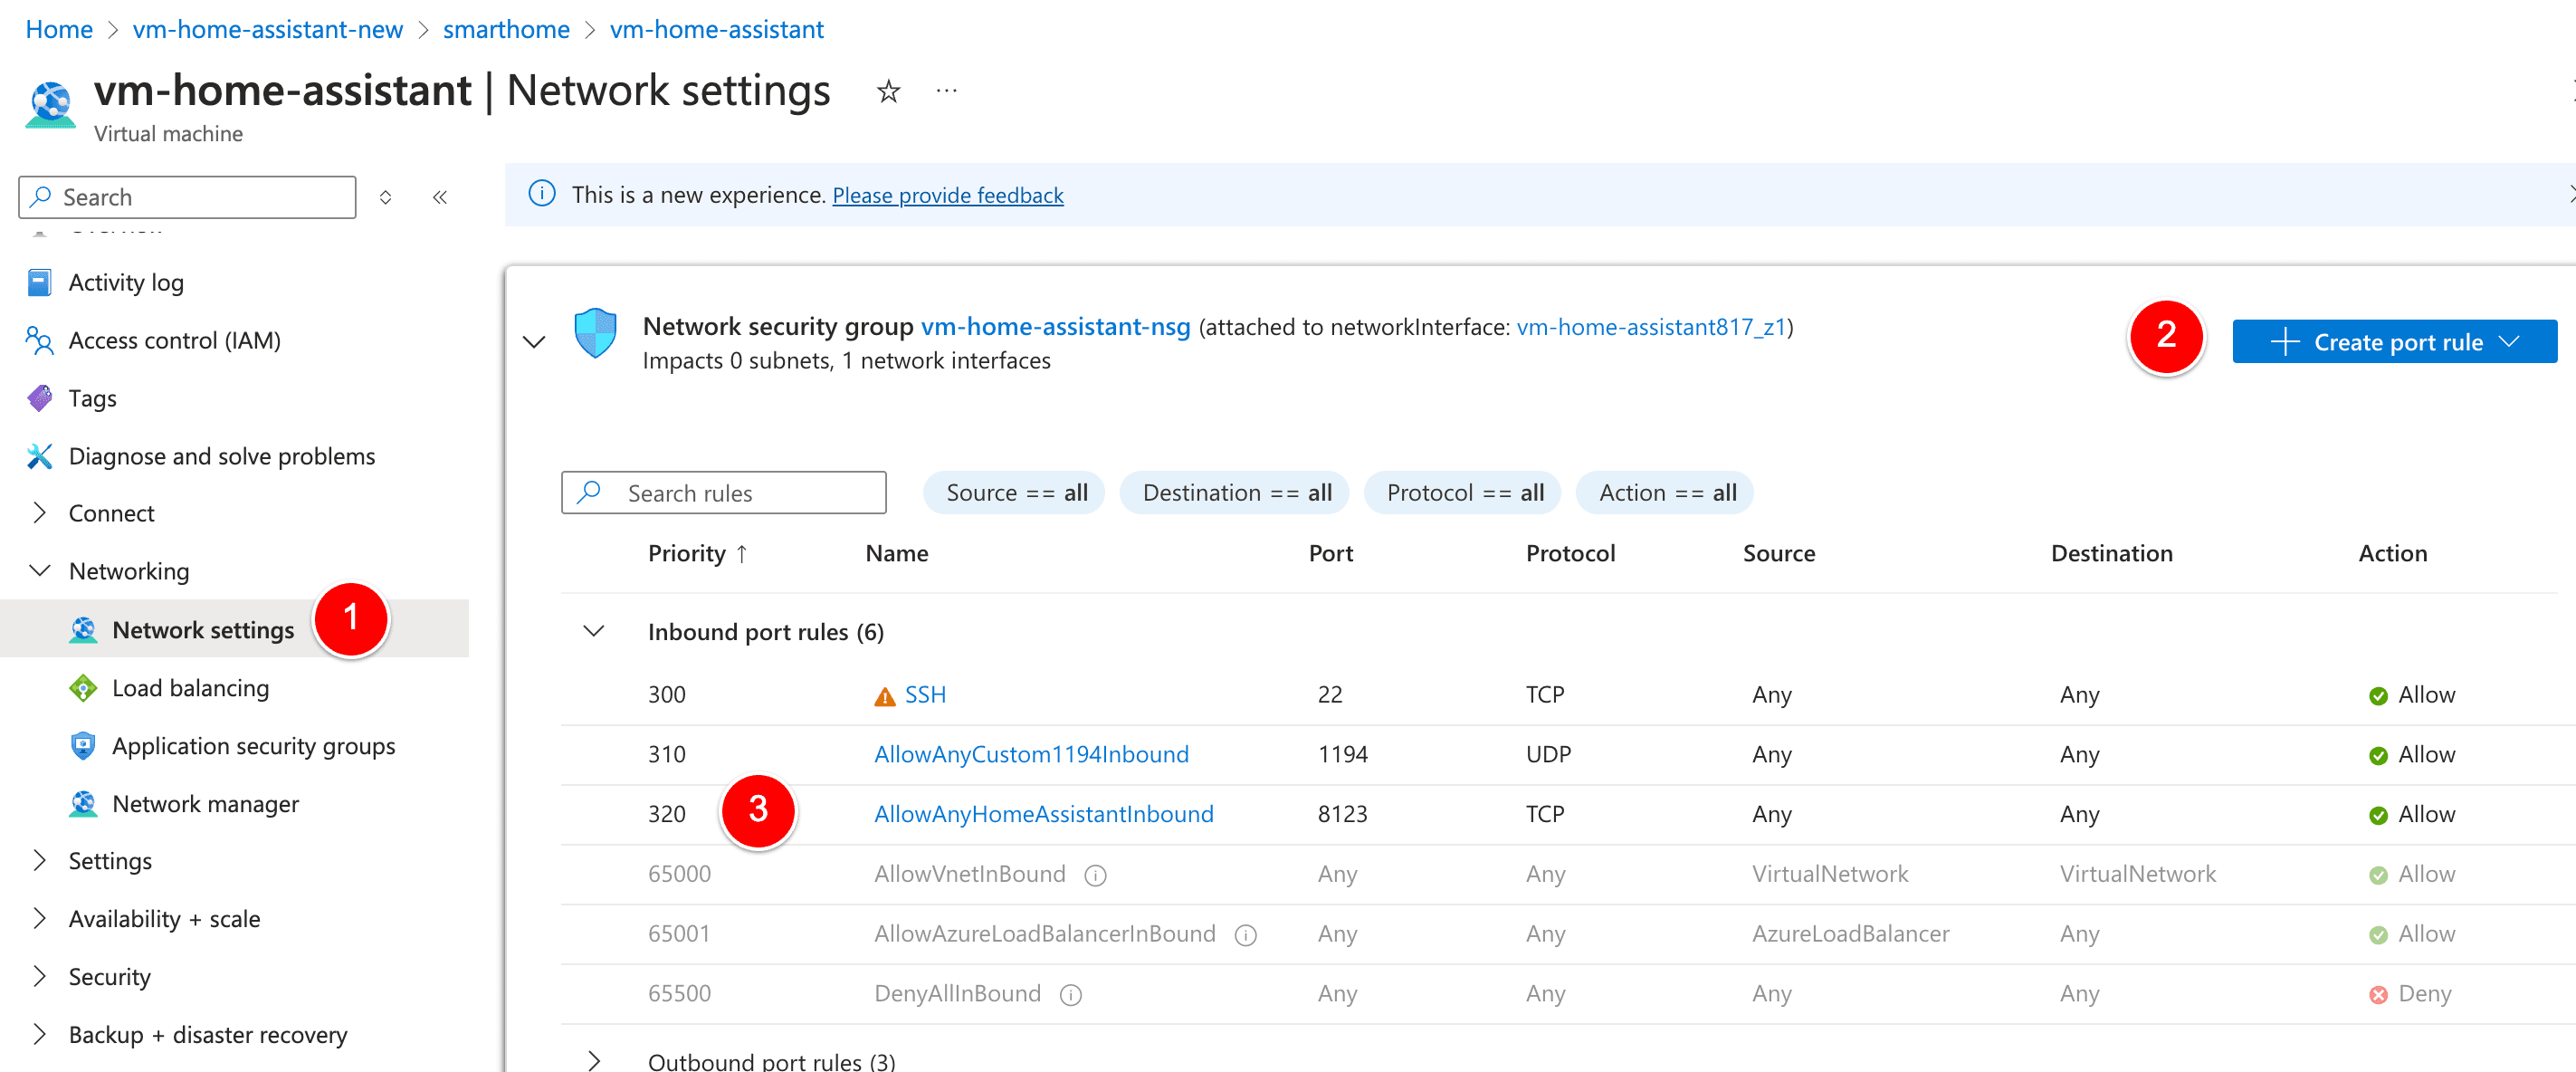
Firewall Settings Azure VM
Don’t forget to open the TCP port 8123 on your Azure VM.
Now you have Home Assistant up and running. In the next posts, I will show you how to setup “HACS” Home Assistant Community Store and further configuration steps. Home Automation is not so tricky ;-)
Cloudapp-dev, and before you leave us
Thank you for reading until the end. Before you go: